My Design Process
- Emilie Collings
- May 23, 2024
- 6 min read

Updated: May 28, 2024

This is the process I followed to get to my final digital artefacts.
Below are the Scandinavian animals I could have used.

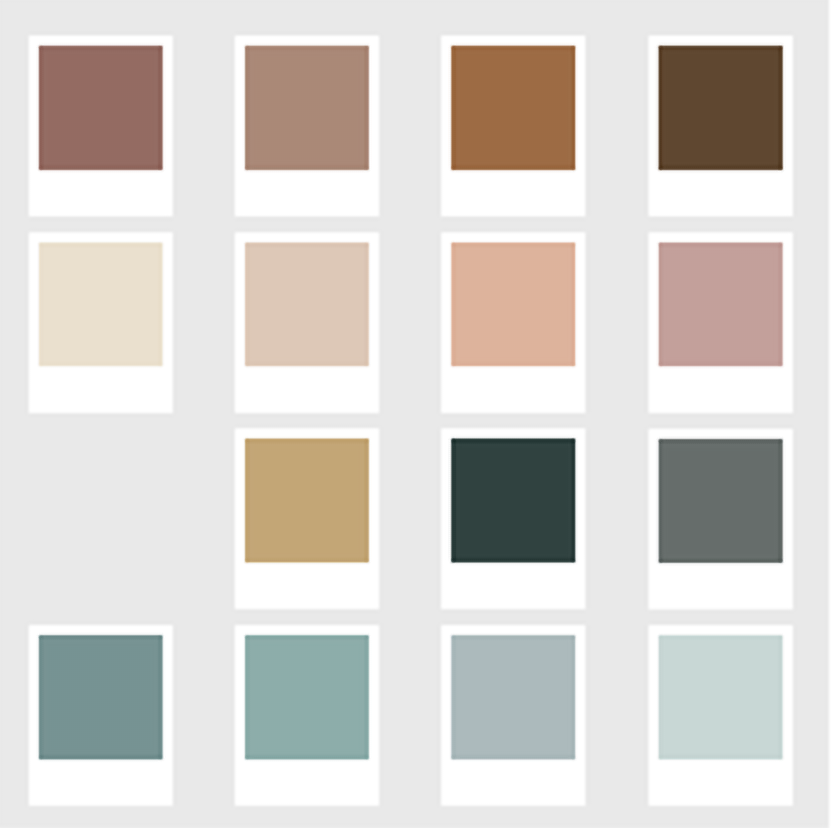
Below are some of the colour palettes I considered using, but my final palette that I used for the project is below:


Below is the final colour palette I used for the project. I chose to use this colour palette because I preferred the muted tones over the bright colours, and I felt that these tones better suited the Scandinavian style, which chooses natural materials when possible and the mood this palette evokes is very relaxed, similar to the Scandinavian vibe.
Procreate:
I found photographs of these animals and created a silhouette outline over the top of them in procreate, I need to make sure that the shape was still easy to tell which animal it was, even with no details added. Below is some of the shapes of animals that I did not end up using.


These silouhettes are the ones that I did use for my project:


In procreate I drew the basic outlines of some of the flowers and chose my favourite ones to use for the project. I drew the flower shapes onto the silhouette of the animals.
I experimented with bright colours, and muted colours, large amounts of negative space and small amounts, and tried making the elements larger and smaller to see what mood and effect I would get.


I wanted something else to go in between the floral elements that made it a bit more obvious that it was folk style so I decided to use tiny curved dashes all over within the negative space.

I exported animals with the flowers over the top as PNGs with transparent backgrounds, and sent them to my computer.
Below are some of my experimenting with sizes/colours and negative space:


I also experimented with designing a whole sheet of flowers to apply to the shapes to speed up the process. These versions are also digital watercolour style that I was trying out, rather than the flat vector style. The bear is the watercolour flower version. I did not end up using these versions in the final design.


These are examples of some of the sheets of flowers/leaves I designed whilst testing out methods, this was to speed up the method of drawing each flower by hand on every animal, but I didn't like the outcome as much, the placements of the flowers, so I decided not to use sheets for the end products.


Adobe Photoshop:
I took the elements into photoshop so that I could start to arrange patterns.
To do this I open Photoshop and click create new file. I make a 2000 by 2000 pixels square at 300 pixels per inch dots per inch with a transparent background. And I make sure it's in CMYK colour profile because it will be printed out. Then I go to file, place embedded and find the elements that I want to put into the pattern.
So, in Photoshop I go to view pattern preview and then I can see the repeat square repeating over and over. From here I can resize them and move them around using the transform tool. So, I put it wherever I want it to go and then I can add in other elements I'm taking a print screen of this to show how it works and then

When I want to export it, I go to export as PNG from the pattern preview mode (shown below) because if you go back to the normal mode, it won't save as a repeating pattern. So that's a fairly simple way to make a pattern in Photoshop.

I made a few patterns in photoshop, when I thought, why don’t I vectorise the animals so they are scalable to any size?
Adobe Illustrator Image Trace:
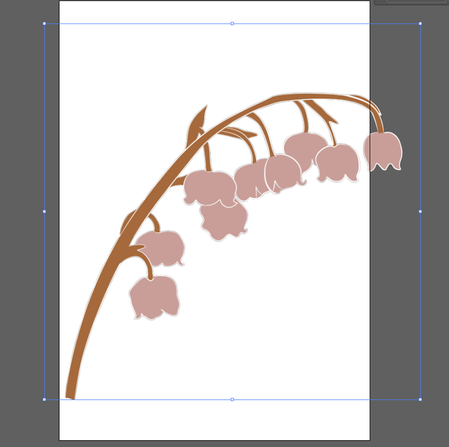
To use the Image Trace tool, I just create a document of any size. Then I use the Place tool, in file, to place one of the elements into Illustrator. I take these blue bells that were used in my pattern and put them into the file in raster form.
The only way I could figure out how to make this work properly with the white edges was to convert it into black and go edit colours, convert to grayscale. Now I go to edit colours, invert colours. Then I can go to the image trace panel and choose, I usually choose high-fidelity photo, to retain as much detail as possible, and then it figures out all of the mathematical equations that create a vector image.

So then if you're happy with what it created. That's the zoomed in image trace.
There is a lot of options you can do for the image tracing. You can simplify it, there's a black and white option, you can also snap the curves to the lines. The next step is to go to object menu and then expand and OK. Then it's created the vector, but it also has a white background around the edge. Then I have to go to the Direct Selection Tool and select the edges and click the delete button. So now it's just a transparent background.

The last job is to pull in the colour palette that I want to recolour these in the original colours. Using the eyedropper tool, I want the main stalk, so I go to direct selection, and selects the bit that I want to change, and hold down the shift key to get multiple sections in one go. Then I go to the eyedropper tool and choose the colour that I wanted from the original, and I do the same with the petals as well. I had played around with image trace previously, but I definitely learnt a lot this time and am very confident using the tool now. already had the skills but wanted to improve as much as possible.


I remade the patterns I had made in photoshop as Raster formats in Illustrator as vector patterns, using my new vector elements I created.
Adobe Illustrator:
So, in Illustrator I go to new file, again I choose 2000 by 2000 CMYK, colour profile 300 pixels per inch with a transparent background. With a transparent background. Again, I go to file and place and then I can choose which element to put into the file.
When it comes to making a pattern in Illustrator, I put the image somewhere and then I have to move the file, to the other side at an equal place. So I go to object, transform, move. Because I know that the canvas is 2000 pixels, I can say I want it to move horizontally 2000, but I don't want it to move vertically and then I click copy. So, then what I do is select shift on both of them and control G to group them. So now whenever I move those two elements, they stay 2000 pixels apart exactly. I do that process with every element in the pattern. If it's hanging off of the edge on one side it needs to be repeated on the other side so that it makes it completely seamless.


When I come to export in the pattern, what I need to do is create a rectangle that is 2000 pixels by 2000 pixels and then go to properties and I make sure it's aligned in the middle both ways so it's perfect. To make a clipping mask to check if the pattern is repeating properly, and what it looks like, I select all the elements, right click, make clipping mask and then that cuts it off as a seamless repeated square.

When I'm ready to export the pattern, I have a rectangle underneath and one on top, the size of the canvas. Selecting all the elements I go to the Pathfinder menu. I choose the subtract front option, which cuts a window so it’s a square that repeats seamlessly. Below is when I was checking the repeat to make sure there were no errors.

I had to decide which background colours to use, I wanted to go with neutral colours.
I had to then export the files from Illustrator. I learnt a lot more than I knew about the different file types of raster and vector and how they work.
The background was too plain, so I added dashes as textures which I also vectorised. Then it needed something else so I decided to add little leaves and flowers as well to complete the pattern. The background leaves, dashes, leaves and flowers are all from the animals’ elements, so that it creates a cohesive design.


I wanted to use this fabric collection to display in my Exhibition in Exeter 13th- 17th May, so I bought some fabric samples from Contrado. The pack contained hundreds of different types of fabric, with different properties and weights. Below is the fabrics that I narrowed my choices down to. In the end I chose to print the pattern onto Janice Poplin Organics Cottons, 135gsm weight because I didn't want it to be see through when hung up, but I wanted it to drape nicely and not be too heavy.


Comments